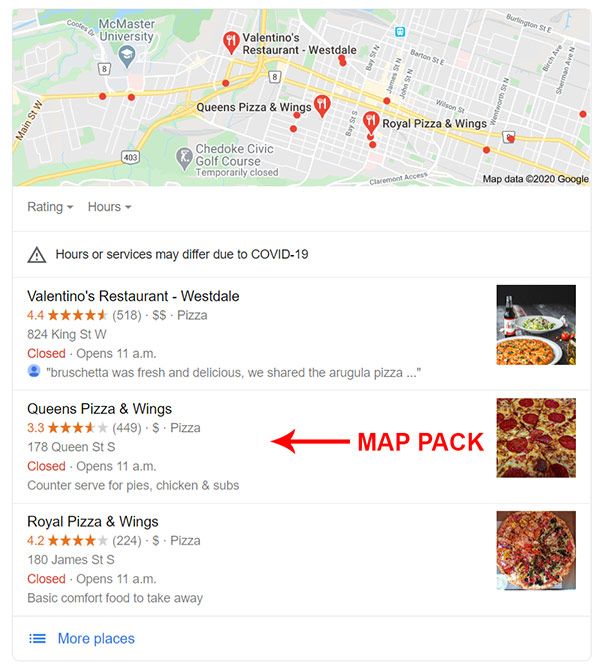
Your Google My Business Listing is an important ranking signal to Google’s local algorithm when it comes to being found in the Google map pack, Google maps, and localized search results.
In a previous blog post, we covered in detail how to optimize your Google My Business Listing for maximum visibility.
In this blog post, we are going to cover the why and how of optimizing your photos for Google My Business and local search with the help of geo-tagging (it’s not as hard as it sounds).
What is Geo-Tagging and Why Does it Matter?
Geo-tagging is the process of adding geographical information to various media in the form of metadata (data about the data). The data usually consists of coordinates like latitude and longitude (location), but may even include additional information.
Geotagging is most commonly used for photographs and can help search engines see the association between that photo and a specific location. If you are a regional company or business, geo-tagging is incredibly beneficial.
A few benefits to geo-tagging include:
Search Queries: Search engine users typically add in location-based information when typing something into a search bar. For example, someone might very well type in “Pizza Shop Hamilton” Therefore, you want your company to be associated with this location so that you appear in that search.
Image Search: We can’t forget that photos also show up on many SERPs (search engine results pages), often at the top. If you can geo-tag your images, it will help search engines determine which images should show up on that SERP, ideally your businesses.
“Businesses with photos receive 42% more requests for driving directions to their location from users on Google, and 35% more clicks through to their websites than businesses that don’t have photos.”
Optimal Google My Business Image Specs and Best Practices
Before getting into how to go about geo-tagging your images, lets briefly look at some of the optimal specs for your GMB listing photos as well as some best practices.
- Each image must be smaller than 10 MB in size
- Each image needs to be a minimum of 720 by 720 pixels
- Each image name should follow this format (or close to it): Company_Name_City_Business_Category
- Upload at least one photo for each section of your GMB profile (business logo, cover photo, external business view, internal business view, team member, photo demonstrating your product or service)
- Don’t overthink the photo’s, a professional photographer is not necessary but they do need to be high quality (not pixelated, blurry)
Manually Geo-Tagging Your Images
If you are using devices to take photos that are NOT GPS enabled, have location services turned off or you are not sure if they have been geo-tagged – below is one of the easiest methods you can use to about geo-tagging your photos.
To get started, visit https://tool.geoimgr.com/. GeoImgr is a paid tool but offers a free version that allows for up to 5 image upload per day. The only catch is you will be required to manually set the location pin in the correct area of the map for each image (it is free after all).
For only $9.90/month you can access the pro version which makes the whole process much easier. Visit the GeoImgr pricing page for more information.
By following the process in the video below, you will have optimized photos with location data embedded.
Note: It’s important to mention that if you already have photo’s uploaded to your GMB listing it is recommended that you DO NOT delete and re-upload them. Doing so will diminish all engagement (example: views) those phots have. Instead, focus on optimizing all new photos from this point on.
In the video above, you will want to use “Way 2, Drag and Drop the Pin” to complete the geo-tagging process.
Automatic Process of Geo-Tagging Photos
If you’re taking your photos on a smartphone, ensure you have your phone’s Location Services switched on. If you do, your photos will be correctly geo-tagged, and nothing else is required. If you’re using an iPhone, you can find instructions on turning your location services on here.
Conclusion
Now that you have your photos geo-tagged and optimized for Google’s localized search algorithm it’s time to upload them to your Google My Business profile. Upload them just like any other images and your done!
In our next blog, we’ll be looking at Citations (finding, fixing, building, and optimizing) and how they can further benefit your local search ranking. Until then, happy optimizing!